Learning how to install rubber tracks on a skid steer is an essential skill for maintaining productivity and reducing downtime on your job site. Proper installation helps ensure stability, traction, smooth operation, and long track life. This guide explains what skid steer rubber tracks are, how they work, and provides a detailed step-by-step installation process to help you replace worn tracks safely and correctly.
If you need help selecting the correct track size for your machine, contact our team for fitment support.
What Are Skid Steer Rubber Tracks
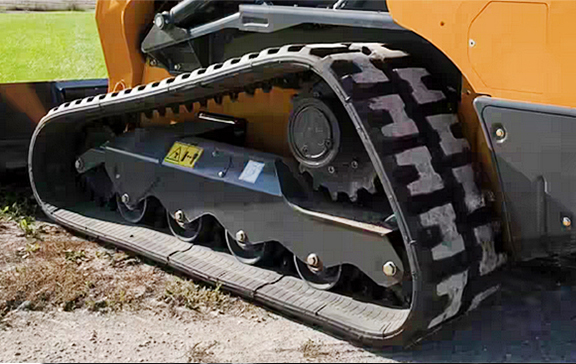
Skid steer rubber tracks are continuous reinforced belts built to give your machine maximum traction, flotation, and ground stability. They allow a skid steer to operate on soft ground, mud, snow, clay, and uneven terrain where tires would struggle.
Rubber tracks are typically used on track-equipped skid steers and compact track loaders. They provide benefits such as:
- Lower ground pressure on sensitive soils
- Better traction in wet or loose material
- Reduced vibration and improved operator comfort
- Smoother travel over rocks and ruts
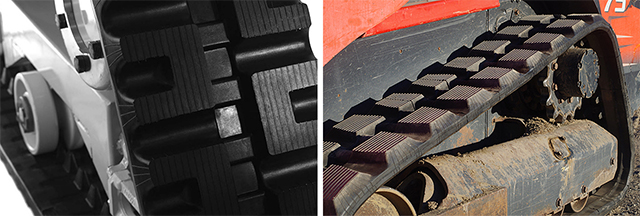
Different tread patterns are available for varying environments, such as general construction, soft ground, or aggressive terrain.
To explore replacement options, view our selection of rubber tracks.
Step-by-Step Guide to Installing Rubber Tracks
Below is an expanded version of the original 10-step installation process. These tips help prevent common mistakes and support a smoother installation from start to finish.
1. Prepare Your Tools and Work Area
Before beginning the installation, gather tools such as:
- Hydraulic jack or lifting equipment
- Blocking stands or cribbing
- Grease gun
- Pry bars
- Safety equipment
Confirm that the replacement tracks match your skid steer’s model and track size.
2. Lift and Secure the Machine
Use a lifting device to raise the skid steer until the track system is fully off the ground. Ensure the machine is supported securely so it cannot shift.
3. Release Tension in the Grease Cylinder
Remove the valve cap and release grease from the tensioning cylinder. This retracts the idler and reduces tension on the old track, allowing it to slip off more easily.
4. Remove the Old Track
Rotate the track while guiding it off the idler and sprocket. Use pry tools if necessary, but avoid forcing components that could damage the undercarriage.
5. Inspect Undercarriage Components
Check rollers, idlers, sprockets, and frame guides for wear. Undercarriage wear affects track life and machine performance. Replace worn parts as needed.
For replacement wear parts, see Construction Equipment Track Parts.
6. Replace the Sprocket if Needed
If the sprocket teeth are worn or sharp, install a new sprocket to prevent premature wear on the new track. Proper sprocket condition ensures smooth engagement with the lugs.
7. Install the New Rubber Track
Position the new track around the sprocket first, then guide it over the idler. Ensure the drive lugs line up correctly. A misaligned track can cause premature stretch, derailment, or uneven wear. Before adding tension, verify that the track rides centred on the idler and the guide lugs seat fully into the sprocket.
8. Re-tension the Track
Pump grease into the tensioning system to extend the idler. Follow the manufacturer’s recommended track sag measurement. The track should not be loose enough to slip off or tight enough to strain the undercarriage.
9. Inspect Alignment and Tension
Spin the track slowly by hand or by cycling the machine. Ensure the lugs engage properly and the track runs straight. Adjust tension if needed. After a short test creep, recheck sag and alignment. Readjust if the track walks to one side.
10. Replace the Opposite Track
For optimal performance and consistent traction, replace both tracks at the same time. Repeat the process for the opposite side.
What Tools Are Needed to Install Skid Steer Rubber Tracks
To complete a safe and efficient rubber track installation, you will need:
- A hydraulic jack or lifting arms
- Jack stands or blocking
- Grease gun for tensioning
- Pry bar or track installation bar
- Ratchet or wrench set
- Torque wrench for re-tightening any hardware to spec after installation
- Cleaning brush for removing debris
- Safety gloves and eye protection
Each tool plays an important role in lifting, loosening, guiding, and tensioning the tracks during installation.
Common Issues and Troubleshooting
Installing rubber tracks can occasionally present challenges. Here are common issues and how to fix them.
Track Misalignment
If the track is not seated correctly, loosen the grease tension, reposition the track, and verify lug engagement.
Track Falls Off During Installation
This usually occurs when the tension is too loose or the skid steer is not lifted high enough. Re-lift the machine and reset the track.
Difficult Track Removal
Built-up mud or debris can restrict movement. Clean the undercarriage and apply light lubricant around the idler to ease removal.
Uneven Tensioning
Always measure or visually confirm equal tension on both sides. Uneven tension accelerates wear.
Tips for Maintaining Your Rubber Tracks
Good maintenance helps extend track life and reduces replacement frequency.
Cleaning
Remove debris, rocks, and mud from the undercarriage daily. Built-up material can cause derailment and premature wear.
Inspecting for Wear
Check for cuts, cracks, missing lugs, splitting, and exposed cords. Early detection helps prevent on-site track failure.
Proper Track Tension
Adjust tension regularly. Loose tracks derail more easily, while overly tight tracks strain drive components.
Operating Habits
Avoid aggressive turning, constant spinning, and high-speed travel on abrasive surfaces.
How Long Do Rubber Tracks Last on a Skid Steer
Track life varies widely based on terrain and operator habits. On average, skid steer rubber tracks last between 1,000 and 1,600 hours, depending on soil type, machine weight, and maintenance frequency.
When to Replace Skid Steer Tracks
Consider skid steer track replacement when you notice:
- Deep cracking or chunking
- Exposed steel cords
- Severely worn or missing lugs
- Loss of traction
- Frequent derailing
- Increased vibration or poor ride quality
Harsh ground conditions like rock, asphalt, and demolition debris accelerate wear. Timely skid steer track replacement prevents uneven wear on sprockets, rollers, and idlers. If you are unsure whether your tracks need replacement, contact Tag Equipment for guidance.
Frequently Asked Questions About Rubber Track Installation
How Tight Should Skid Steer Tracks Be?
How Can I Replace Skid Steer Tracks Without Special Equipment?
Can I Install One Track at a Time?
Do New Tracks Stretch?
Where Can I Buy Skid Steer Rubber Tracks?
Need Replacement Tracks for Your Skid Steer?
Tag Equipment supplies premium skid steer rubber tracks compatible with leading brands such as Bobcat, CAT, John Deere, Kubota, Case, and more. We offer high-performance tracks with fast shipping, expert support, and reliable fitment guidance.
Contact us today to request a quote. Need help installing rubber tracks on your skid steer? We’ll confirm fitment and pricing for your exact model.